
When a front door lock stops working, it’s more than inconvenient; it’s a security concern. The fault could be as simple as dust in the cylinder or as serious as a worn‑out mechanism. Knowing how to identify and fix common issues helps you maintain safety without rushing into a full replacement. Here’s what you can do to solve this common door lock problem.
If your door lock is broken, repairing it can be a practical alternative to full replacement. After all, who doesn’t want to save money while restoring security in their home? Some of the telltale signs you need repair include a loose handle, a key that keeps getting stuck, a cylinder that is rotating, or even difficulty turning the lock.
Here’s a simple door lock fix guide that will help you get to the bottom of your problems.
When to repair your door lock
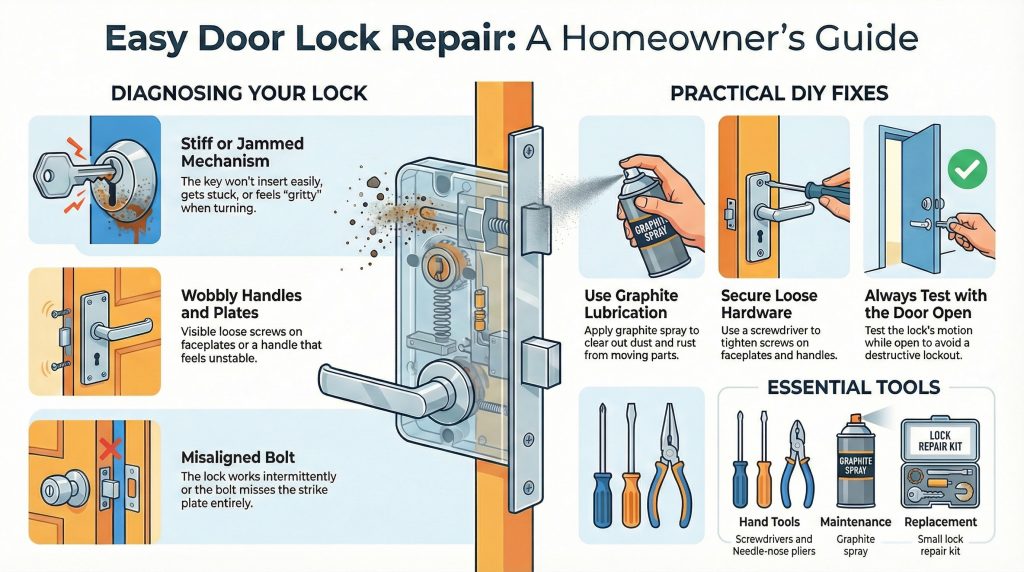
- Your lock is stiff, jammed, or won’t turn.
- The key won’t insert or gets stuck
- The handle or knob is wobbly
- You have loose screws or plates
- The lock works intermittently or feels gritty
- Dust, rust or internal wear can block movement inside the cylinder.
- Loose handle or lock faceplate – Regular use loosens screws or causes misalignment.
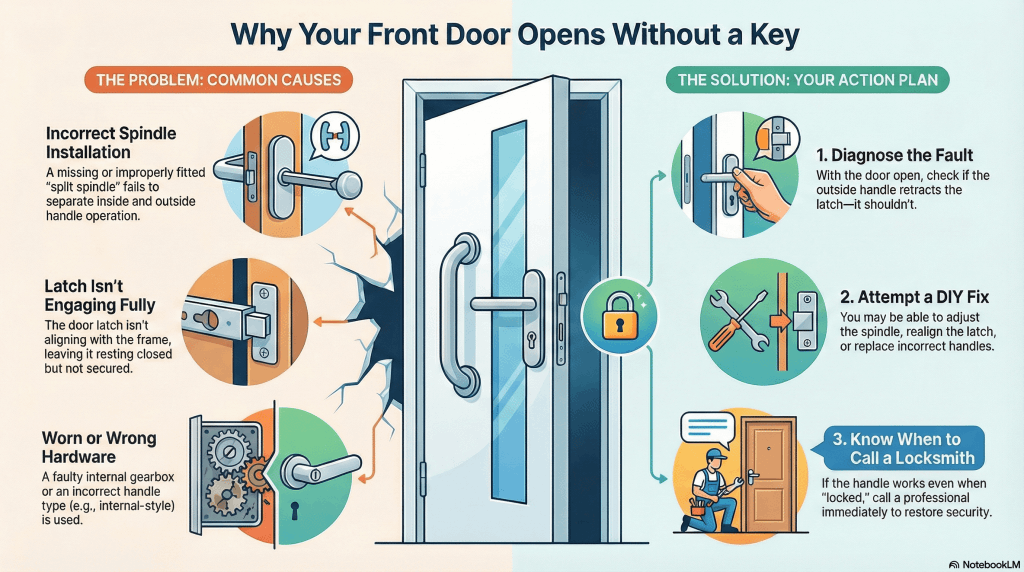
- Key turns but doesn’t engage: A broken tailpiece or worn gearbox prevents proper locking.
- Latch not aligning: Frame movement or a misaligned strike plate causes difficulty locking or unlocking.
- Broken or stuck key: Fatigue or over‑tightening can snap the key in the barrel.
What if you locked yourself out of the house?
Finding yourself locked out can be stressful, especially if you’re locked out of the house at night or in bad weather. Whether you left your keys inside or lost them entirely, it’s important to stay calm and follow a safe, methodical process to regain entry without damaging your door.
Step 1: Double‑Check the Obvious
Before taking drastic action, check all doors and accessible windows carefully. Many lockouts occur simply because a back door or side access hasn’t been fully latched. If it’s dark, use your phone’s flashlight to see clearly.
Step 2: Try a Spare Key or Trusted Contact
If you have a friend, neighbour, or family member holding a spare, now’s the time to call them. In rented properties, your landlord or building manager may have a secondary key.
Step 3: Assess the Lock Type
Understanding whether you’re dealing with a Yale night latch, mortice lock, or multi‑point system helps decide what’s possible. Spring‑bolt locks, such as standard Yale styles, might be released using simple slide tools, while deadlocks need a key or expert assistance.
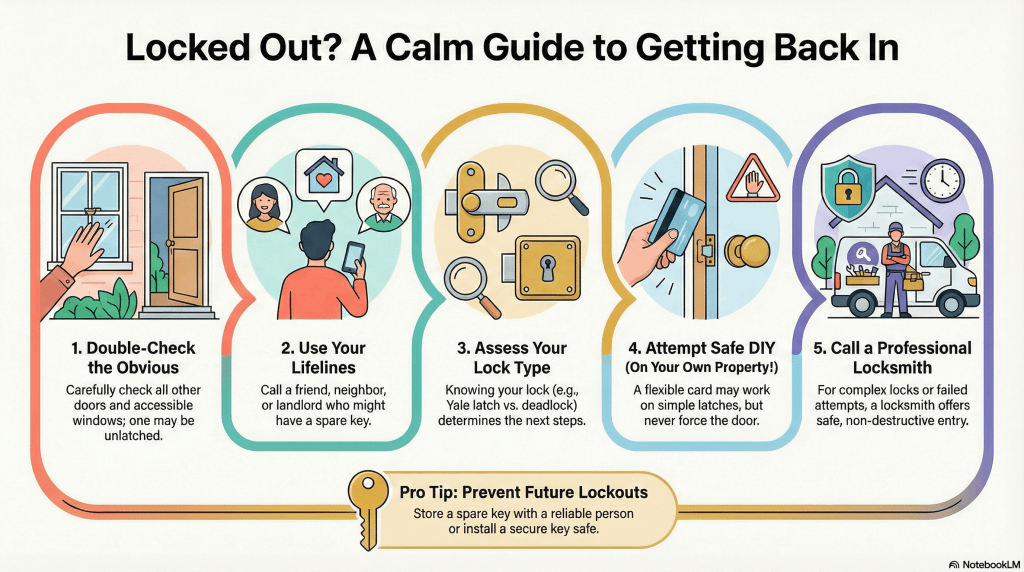
Step 4: DIY Options. Only for Your Own Property!
- Yale‑type latch: Use a flexible card (like an old loyalty card) to slip between the frame and latch and push the bolt back.
- Interior privacy lock: A small pinhole may allow unlocking using a paperclip or screwdriver tip.
- Loose handle or latch jam: Remove exterior screws carefully to free a stuck latch and access the spindle manually.
- Never force the door: Excessive pressure can warp frames or crack glass panels.
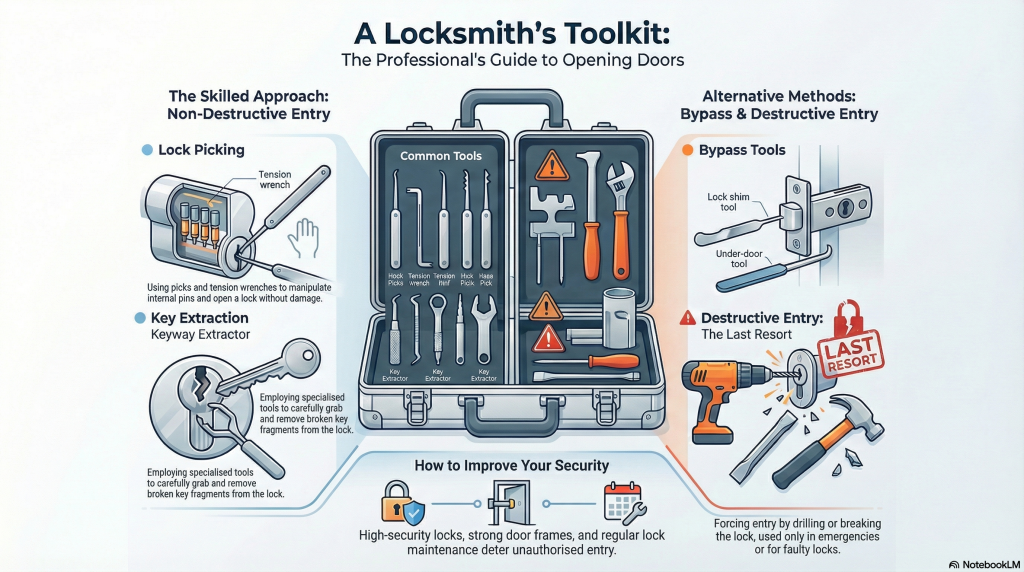
Step 5: Call a Professional Locksmith
If simple fixes fail, or you’re dealing with anti‑snap or multi‑point locks, call a 24‑hour locksmith. Emergency locksmiths are trained to provide non‑destructive entry, meaning they pick or manipulate the lock carefully without causing damage.
Most MLA‑approved locksmiths offer fixed pricing, identity verification, and quick arrival, usually within 30 minutes. After entry is restored, they can rekey or replace locks to secure your home if the keys are lost.
Locksmith Tip
Store a spare key with someone reliable or fit a secure combination key safe outside your property. It’s a small investment that can save stress, time, and money next time you step outside without your keys.
DIY Fixes to Try
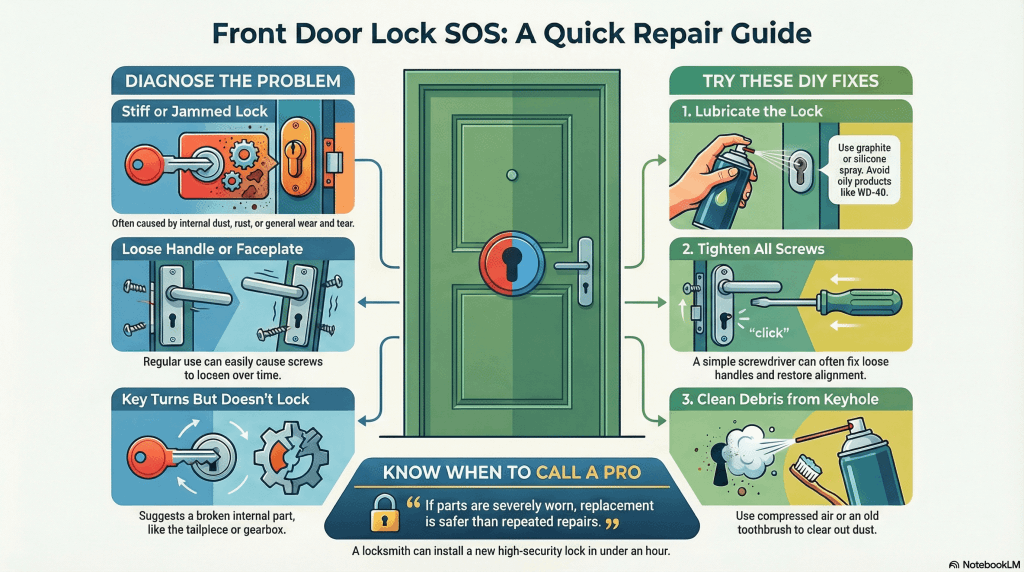
#1. Lubricate the lock.
Use graphite or silicone spray, but avoid oil products like WD‑40, because they attract dirt that can further gum up your lock.
#2. Tighten loose screws or handles.
A quarter‑turn with a screwdriver can often restore alignment.
#3. Clean debris from the keyhole.
Use an old toothbrush or compressed air to clear dust buildup.
#4. Check door alignment.
If locking is easier with the door open, adjust hinges to correct fitment.
#5 Realigning the strike plate:
Adjust the plate on the frame if the lock bolt misses or jams.
#6. Remove broken keys carefully.
#7. Replacing springs or levers:
Internal lock parts can wear out, but the good news is that many are easy to swap with spare kits. Fine pliers or a key extractor work best; never force them deeper. If you don’t have the tools, call a locksmith.
Required tools
Basic repairs need screwdrivers, graphite spray, pliers, and sometimes a small repair kit. However, each door lock fix requires a different approach.
Locksmith Tip
- Never force a jammed lock, as this can break the mechanism, leaving you with more problems.
- Always test the motion with the door open first, because a faulty lock can leave you with a closed door that could require a more destructive fix.
- If repairs fail, upgrade to a certified new lock or call a local locksmith.
- Effective lock repair restores security quickly. It also helps avoid the cost of replacement.
If the latch, cylinder or gearbox are severely worn, replacement is safer than repeated and costly repair attempts. Professional locksmiths can service or install a new high‑security lock in under an hour, helping restore smooth operation and better protection for your home.
The case for changing vs. repairing your front door lock
Changing your front door lock isn’t just about security; it’s also about peace of mind. Whether you’ve just moved in, lost a key, or want to upgrade your home’s safety, a clean lock change makes all the difference.
1. Identify your lock type
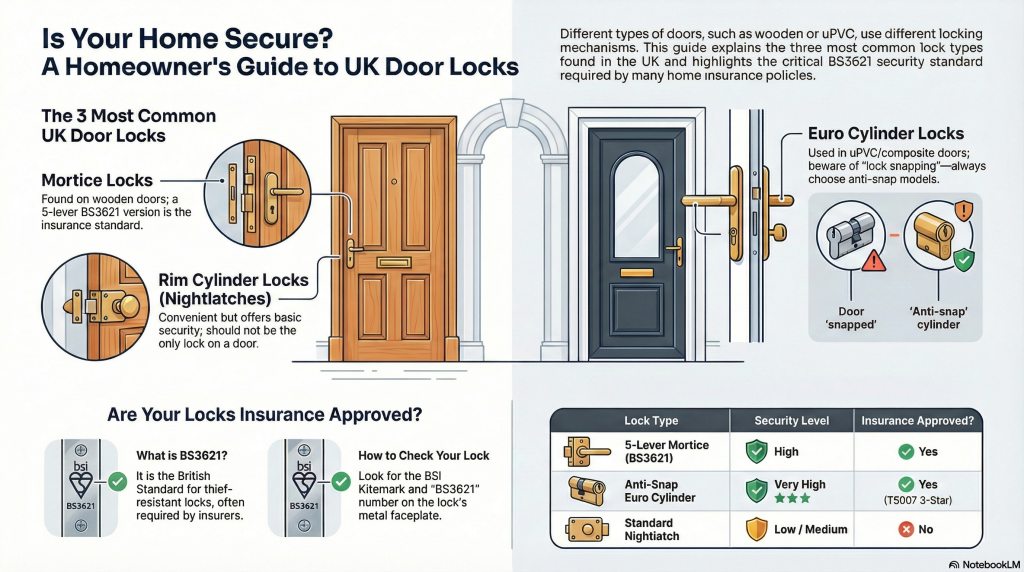
Check what’s currently fitted. Most UK front doors use one of the following:
- Cylinder locks (common on uPVC doors)
- Mortice locks (fitted inside wooden doors)
- Night latches (Yale-style, surface-mounted)
2. Measure before you buy
Get an exact match. For euro cylinders, measure from the fixing screw hole to each end, both inside and outside.
For mortice locks, measure case depth, backset, and faceplate size.
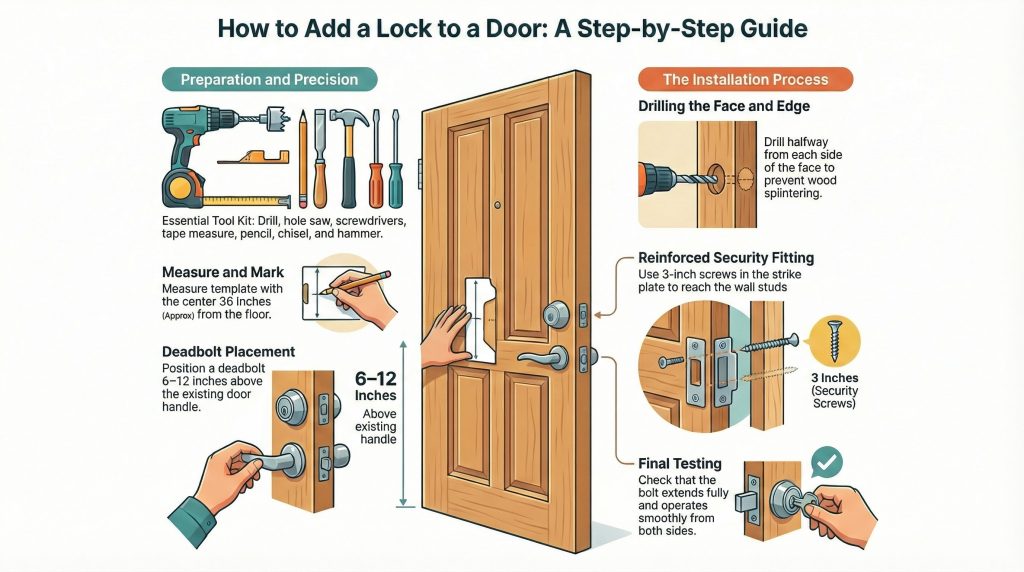
Mark the lock hole centre approximately 36 inches from the floor. If you’re adding a deadbolt, position it around 6–12 inches above the existing handle area.
Use the provided lock template to mark both the face hole and edge hole.
3. Choose quality over price
Always go for a British Standard (BS3621) lock or one approved by your home insurance. Well-known brands like Yale, ERA, and Ultion offer excellent protection against drilling, snapping, and bumping.
4. Remove the old lock safely
Use a screwdriver to remove the retaining screws, then gently slide the old lock out. Don’t force it, especially if the door is painted or swollen. A few soft taps with a rubber mallet can really help.
5. Drill the face hole
Using a hole saw, carefully drill the through-hole for the lock body. Ensure that both sides align perfectly by drilling halfway from each to prevent splintering.
6. Drill the edge hole
Drill the smaller hole in the door’s edge for the latch. This connects directly to the main face hole. Smooth any rough edges using a chisel.
7. Install the latch and cylinder
Insert the latch assembly into the edge hole and fasten it with its screws. Insert the lock cylinder through the face hole, connecting both sides as directed by your lock’s design.
8. Fit the strike plate
Align the latch or bolt with the door frame. Close the door to mark its strike location. Drill pilot holes, chisel a recess for the strike plate, and fasten it securely. For reinforced security, use 3-inch screws driven into wall studs.
9. Test before you tighten
When fitting the new lock, insert the key and turn it several times before fully tightening the screws. Make sure it locks and unlocks smoothly without sticking or grinding.
10. Lubricate the mechanism
A quick spray of graphite powder or a silicone-based lubricant keeps the lock running smoothly. Always avoid using WD-40 because it attracts dust over time.
11. Update your keys
Get a couple of spare keys cut right away and keep one with someone you trust. It’s a simple backup that saves you a locksmith callout later.
Changing your own lock can be straightforward if you have the right tools and knowledge. But for most people, it’s better to call a professional locksmith. A proper fit means you’ll get security and longevity.
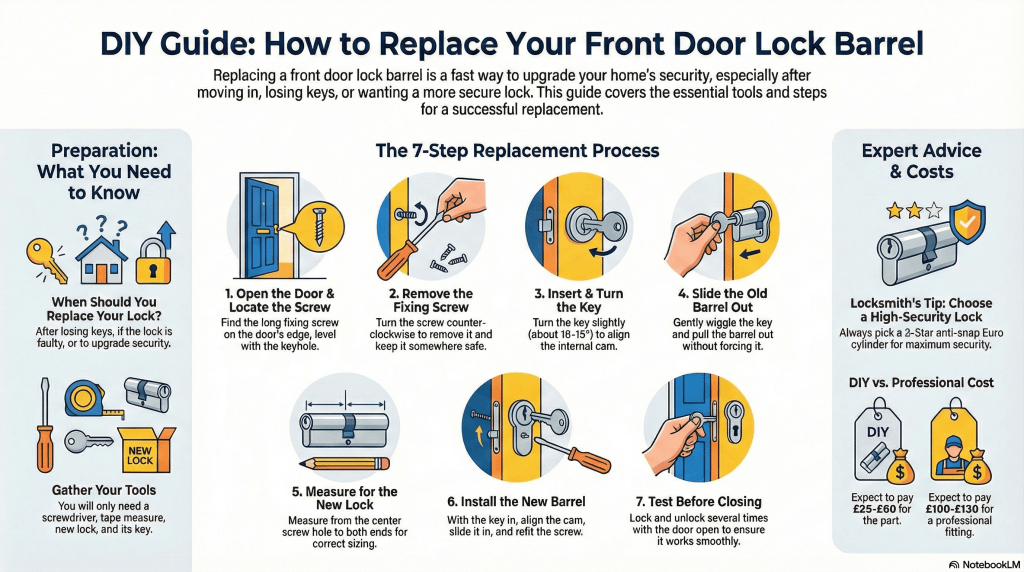
What if you need to replace your front door barrel?
Replacing a front door lock barrel, also commonly called a cylinder, is one of the quickest ways to restore or upgrade home security. It’s ideal after moving into a new property, losing keys, or if you want to upgrade to an anti‑snap lock. You’ll usually find Euro‑cylinder locks on front doors, especially those made from uPVC or composite materials.
When to Replace
- Lost or stolen keys
- Faulty or stiff key turning
- Upgrading to a higher‑security model (TS007 or BS3621 rated)
- Cylinder jammed or damaged.
- Upgrading to an anti‑snap or British Standard lock.
- Moving into a property but keeping the same hardware.
How Barrels Work
The barrel is the central part where the key turns. It controls the locking mechanism but can be swapped independently, making it a quick and cost‑effective security solution.
In this section, we’ll break down how you can change a barrel or cylinder.
Step‑by‑step guide to front door barrel lock replacement
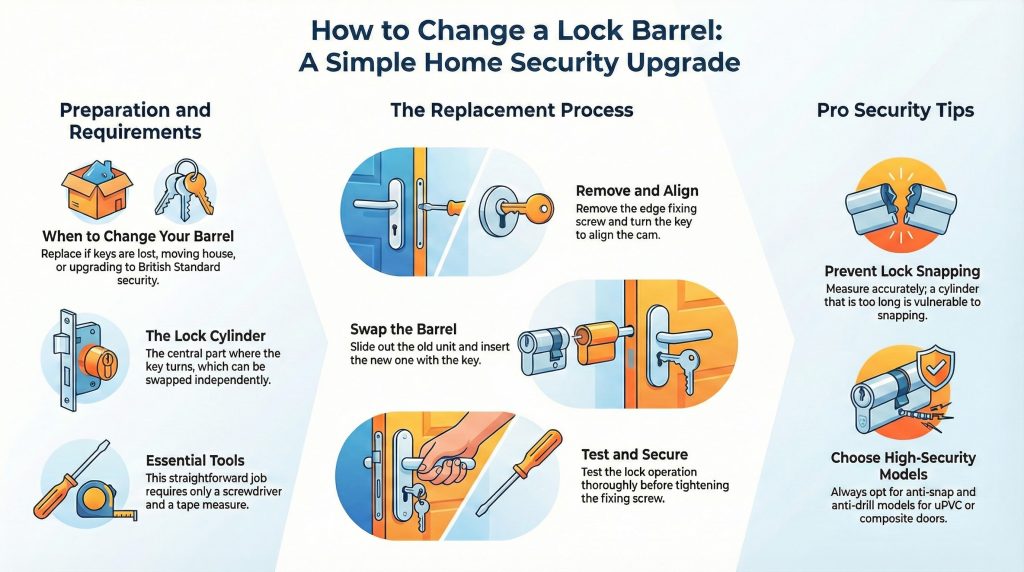
#1. Open the door fully. Locate the long fixing screw; it’s usually level with the keyhole on the door edge.
#2. Remove the screw. Turn anticlockwise and keep it safe.
#3. Insert the key and turn slightly (around 10–15°) to align the inner cam.
#4. Slide the old barrel out while gently wiggling the key; don’t force it.
#5. Measure accurately. Measure from the centre screw hole to each end to ensure you buy the right size replacement.
#6. Install the new barrel. Keep the key in, align the cam, slide it in, and refit the fixing screw.
#7. Test the operation several times with the door open before closing.
Locksmith Tips
- Slide out the old barrel.
- Measure the cylinder accurately. If you make it too long exposes it to snapping.
- Always choose anti‑snap, anti‑drill models for uPVC or composite doors.
- Keep spare keys separate and label them discreetly.
- Changing a lock barrel is fast, reliable, and ideal for everyday security maintenance.
- Always choose a 3‑Star anti‑snap Euro cylinder for front doors because it meets modern security standards and resists snapping, drilling, and bumping. Expect to pay £25–£60 for the part or £100–£130 if fitted by a professional locksmith.
